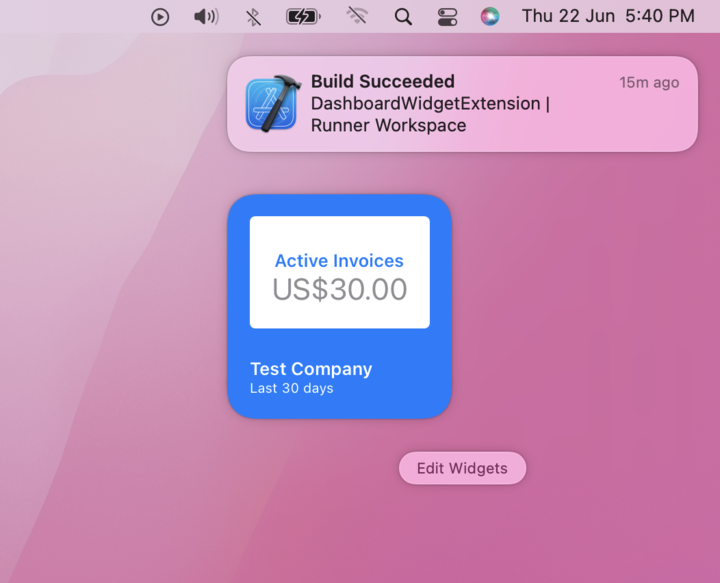
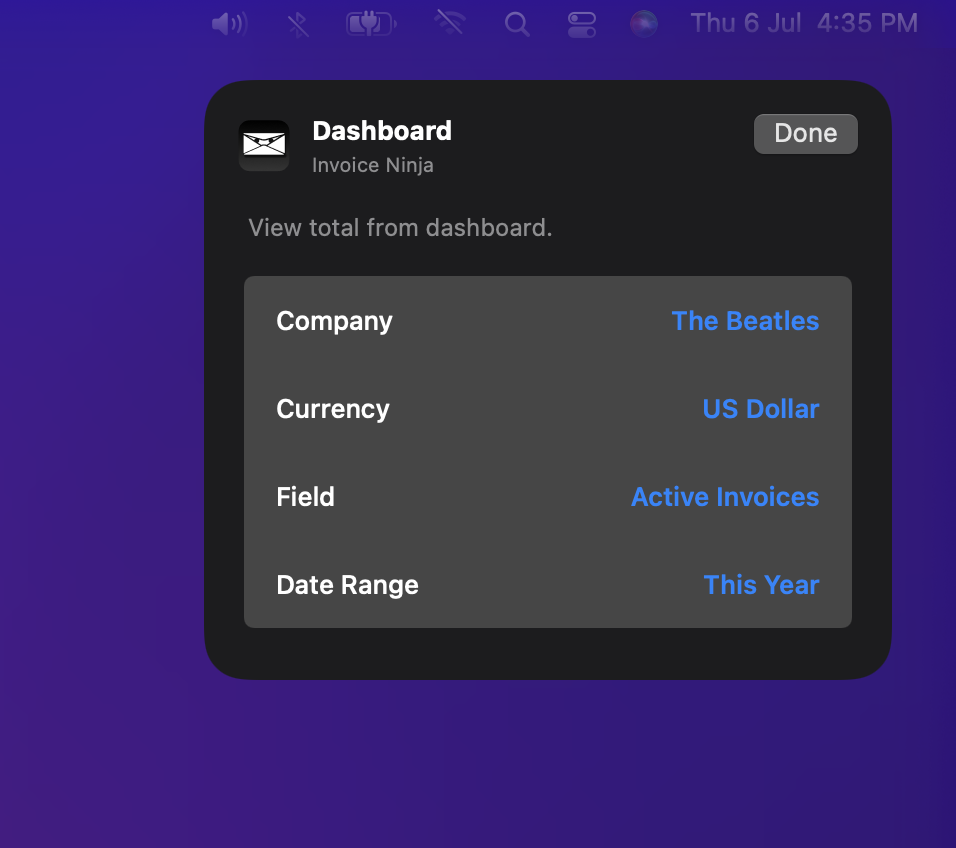
I recently spent some time developing a desktop widget for the Invoice NinjamacOS app, I thought it may be helpful to write a blog post sharing my experience. This won’t be a step-by-step guide, more a review of some of the resources I found useful along the way. For a full guide I recommend this article or video.
YouTube | Build a Native iOS Widget App with Flutter & SwiftUI
Motivation
The main reason for building the widget was to add a useful feature to our app, however I was also interested in having a chance to try out Swift UI. It’d be great if it were possible to build the widget using just Flutter however sadly that isn’t the case. Instead, you can use a package to share data from the Flutter app to the widget and then implement the UI using Swift UI. For our implementation we’re using the widget_kit_plugin package, but I recently came across the home_widget package which also supports Android.
ChatGPT
This was my first time coding in Swift, I found ChatGPT incredibly helpful in getting me up to speed. Here are some use cases which worked particularly well:
Explaining basic concepts in Swift
Converting sample JSON to Swift data classes
Refactoring my poorly written Swift code
Converting Dart code to Swift code
That said using ChatGPT wasn’t without its challenges, around half of the code it generated had errors. I could feed it back the error and it would politely apologize and try again but I often got stuck in loops which ended in frustration.
The old way: – Search Google – Skip ads – Choose site – Accept cookies – Close popup – Find answer
To get up to speed with building the UI for widgets I found the WWDC videos to be extremely helpful, in particular Build SwiftUI views for widgets. If you watch the video you may notice our widget design looks conspicuously similar to the design implemented in the video.
The Swift code for the widget is available on GitHub. As mentioned above this was my first time coding in Swift so try not to judge me too harshly. I’m sure I’ve made many rookie mistakes even with ChatGPT helping along the way. One interesting trick I came across was to use extensions to make it possible to throw any string as an error. This makes the behavior more similar to Dart.
Xcode
In general Xcode worked well however one issue I ran into is that sometimes changes made to the code weren’t reflected when relaunching the widget. I found the following steps would resolve the issue:
Click the widget to launch the Flutter app
Right click the app icon in the dock and select Options > Show in Finder
Close the Flutter app
Delete the app
Repeat until the widget disappears
Final Thoughts
On the whole I really enjoyed developing with SwiftUI. There’s noticeably less boilerplate code (as can be seen in this comparison site) and as one would expect there’s a much tighter integration between the software and hardware than with a cross platform solution. For example, to ensure sensitive data isn’t visible when the phone is locked you can simply add .privacySensitive() to the Text field.
Another area I appreciated was that SwiftUI made it simple to design nice layouts without too much effort. Examples of this are the ability to use .padding(.all) to add a standard amount of padding to all sides or the ability to use ContainerRelativeShape() to ensure the borders radius of nested elements match their parent container.
Although Swift is a great language and SwiftUI is an elegant framework they have one obvious critical flaw, they only support Apple’s platforms. From a business/costs perspective this puts it at a major disadvantage compared to cross platform solutions like Flutter. We’re able to ship high quality apps for Windows, macOS, Linux, Android and iOS from a single codebase, SwiftUI would only cover two of those platforms.
Although we’re using Flutter to build the Invoice Ninjaweb app it wasn’t our original plan. We were about six months into our big rewrite using Vue.js when we had a chance to try Flutter Web (at the time called Hummingbird) for the first time and were instantly convinced. Sure… performance isn’t quite up to native, but being able to share nearly all of our code across mobile, web and desktop is too big an advantage to pass up.
Update: In the end we decided to use Flutter for desktop and mobile and React for web. Sharing code is great but not if it comes at the expense of the final product, Flutter Web is truly amazing but not the right fit for our use case.
That being said in general you can’t just `flutter run -d chrome` and expect your mobile app to be a great web app. We found there were two areas we needed to focus on: UI layout and keyboard support.
UI Layout
I consider our app to be a relatively standard business app. It’s built with flutter_redux and uses a REST API to support CRUD actions (create, replace, update and delete). The primary views in the mobile app can be broken down to three parts: the sidebar navigation, the list view and the detail view.
A common approach to handle the mobile/desktop differences is to use a LayoutBuilder. While we do use it in some places in the app to adjust the layout slightly we don’t use it to adapt the entire UI. The navigation models between mobile and desktop are too different to make this an optimal experience on both platforms.
In the mobile app each screen is its own route. If you view the client list and then select a client there would be two routes on the stack. For the desktop version we instead use a ‘route’ string which the UI binds to. If the route is /invoice/view the UI will show the invoice list with the view panel on the side.
This dual navigation approach is relatively simple to implement in Flutter. In the main MaterialApp widget on mobile we set the list of routes whereas on desktop we provide an onGenerateRoute function instead.
Another example of how we adapted the mobile UI is the dashboard. On mobile it’s a single screen with multiple tabs whereas on desktop we use the two primary tabs as the center content and then show the remaining tabs on the side. The scrolling is linked to the selected tab so changing one automatically changes the other.
In the mobile app the client screen uses ListTiles to display the client’s invoices, quotes, etc. If you tap the invoices option you see the invoice list filtered by the current client.
The desktop app behaves the same way, when you tap on the invoices option the invoice list is filtered by the selected client. We show a filter menu at the top implemented using the awesome overflow_view package from Romain Rastel which enables easily changing between all of the client’s records.
There’s also an option to show the filter as a sidebar on the left side of the screen. This provides a broad view of the data, enabling you to easily navigate between records while having your context remained fixed.
Keyboard Support
The built in date and time pickers have keyboard options however if your users need to select multiple values (ie, in a table) they can be cumbersome to use.
To solve this we implemented date, time and duration pickers which make it easier to select values with the keyboard. All of the widgets use the same basic principle: we use a FocusNode to detect when the text field has focus, parse the string to get the new value to display as a preview and then update it when the widget loses focus.
Odds and Ends
One challenge we ran into once we deployed the app is since we’re using a PWA when we release a new version users may continue using the old version for some time. Even force refreshing the page will still use the cached version which (I believe) can hang around for up to 24 hours. Majid Hajian was kind enough to share this solution which will notify the user if a new version is available.
We’re currently using local storage to persist the web app state. While it’s possible to use the browser settings to clear the storage I’ve found it’s useful to support a ?clear_local=true property to clear it, when the backend sees the flag set it displays this JavaScript to clear the storage.
If you need more control over how tab focus traversal works you can wrap your widgets in a FocusTraversalGroup widget and set the policy, we use WidgetOrderTraversalPolicy in our app.
Final Thoughts
Although Flutter Web is an amazing technology we haven’t used it to rebuild our entire web app. We use Flutter for the admin portal which is used regularly by our users but the client portal which is used less often by more people is built using standard HTML/CSS. We think the combination of the two provides the best performance profile for each group of users.
I’d also like to thank Clemens Mol for his amazing contributions to the design, his input greatly improved the overall look and functionality of the design.
I've been coding for 20 years but still find design hard. I'm extremely appreciative that @clemensmol took the time to mock up an improved design to our app. You can see the current design for reference here: https://t.co/Wf3seI4hys, I think this is a massive improvement #Flutterpic.twitter.com/6Jii6JDMMO
Thanks for reading! I’m on Twitter at @hillelcoren, I record a podcast about Flutter available here and you can sometimes catch me recording music on my side-project mudeo.app (also built with Flutter).
About two years ago we decided to rewrite our native mobile apps using Flutter, then a year later we decided to use Flutter Web to convert our mobile app into our new web app. You can see the results of our efforts at invoiceninja.com/demo. This is an early pre-release demo but we’re really happy with the results so far.
While working on the app we’ve run into a few different challenges specific to Flutter Web, I thought it may be helpful to compile some of them into a post.
Checking if on Web
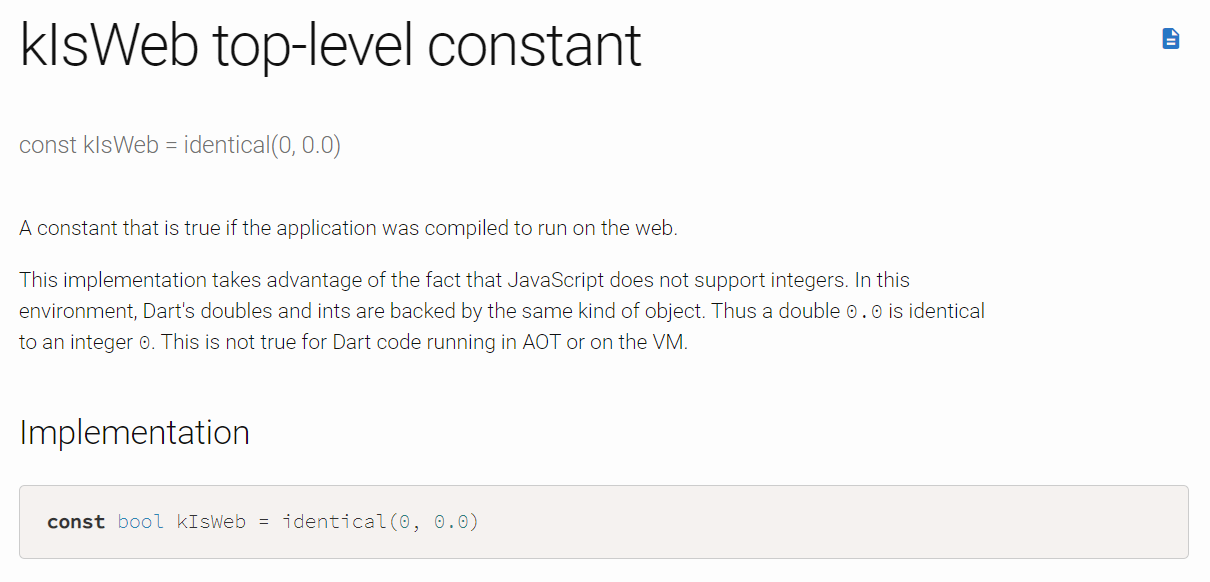
To start, to check if the app is running on the web you can use the kIsWeb constant.
It’s interesting to note how it’s implemented. The underlying differences can mean the runtimeType value of a variable may be different on web and mobile between int and double.
Browser Navigation
In the app we have two distinct navigation models: when the app is used on a mobile device the user can navigate between routes however in tablet/desktop layout a single ‘main’ route is used.
By default the app’s routes are integrated with the browser, when a user clicks the back button the current route is popped from the stack. This works on mobile but not tablet/desktop. To resolve this the app tracks it’s own history and uses a WillPopScope widget to ensure the right screen is shown after back is pressed.
Related to this you can use RendererBinding.instance.mouseTracker.mouseIsConnected to check if the user has a mouse.
Focus Traversal
An important difference between the mobile and web/desktop versions of the app is that users are likely to have a keyboard and mouse. Out of the the box when using the Tab key to move the focus the next element to the right will be selected.
Our app has three main columns so it’s important the focus is shifted down first and then to the right. We’re able to change the behavior by wrapping the UI in a DefaultFocusTraversal widget setting the policy parameter to WidgetOrderFocusTraversalPolicy().
NOTE: DefaultFocusTraversal has been replaced by FocusTraversalGroup #545
Conditional Imports
For some web features it can be useful to import the dart:html package, the problem is once the package is imported the mobile version of the app will fail to build with the message: Error: Not found: ‘dart:html’. This can be solved by using conditional imports.
If you're a @dart_lang package developer, please consider conditional imports (for exemple if you use 'dart:io'). This makes your package fully compatible with @FlutterDev Web ! pic.twitter.com/pNysn7atWj
We keep all web related functions in a file called utils/web.dart and then have another file called utils/web_stub.dart which has the same functions without the implementations. In a file where the web functionality is used we add the following import:
import 'package:invoiceninja/utils/web_stub.dart'
    if (dart.library.html) 'package:invoiceninja/utils/web.dart';
The web.dart file linked above has basic solutions for uploading/creating files as well as managing cookies.
Although we’ve made progress in most areas one feature we’re blocked on is enabling the browser to remember the username when a user logs in. We’re able to use local storage to persist the user’s data however we haven’t been able to get the browser’s password remember feature to catch the username along with the password when the user first logs in. If you have any ideas how to make this work please comment below.
Update: Here’s a possible solution…
You add a hidden form and input fields and hook up the element id's in Flutter to read the text values to set the default values to the TextEditingController. Then hook an event listener to onSubmit of the form this let's the browser hook the remember feature up.
Thanks for checking out the post, hope you found it useful! The source code for the Flutter Web app is available on the develop branch at github.com/invoiceninja/flutter-client. If you have any questions I’m happy to help, I’m reachable on Twitter at @hillelcoren.
If you run into any version conflicts a good approach to fix it is to set the version to any (@koorankka), run upgrade again, and if it completes check the pubspec.lock file for the version it resolved to and use it in the pubspec.yaml file.
I also strongly recommend bookmarking the “Workarounds for common issues” page in the Flutter Wiki, in particular the section on pub dependencies.
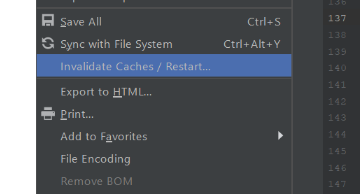
Related to this if your project fails to open correctly in Android Studio you should be aware of the “Invalidate Caches” option.
Also in Android Studio the keyboard shortcuts (@pblead26) I use constantly are Shift + F10 to run the app, Ctrl + Alt + L to format it and Alt + Enter to show the context menu.
I’m a huge fan of dartfmt, and love how it makes the code consistent. I find it can be helpful to run:
flutter dartfmt lib
To apply formatting across the entire project, in particular this can help clean up future git commits.
A default Flutter project has pretty forgiving linting rules, you can use the sames rules as the Flutter team by downloading the analysis_options.yaml file from the repo. I highly recommend this if you’re new to Dart as it can help reinforce some best practices when getting started.
Quick shout out to Effective Dart, an amazing resource for learning Dart.
In general Flutter’s errors are extremely clear, however the Gradle build errors are sometimes a bit less informative. A useful trick is to open the android folder of the project directly in your IDE and build the app from there, it can sometimes reveal more details about the problem.
One mistake I continue to make is to mix up the use of parentheses. For example, either of the first two are fine however if you map the property directly to the called function it will cause it to be called repeatedly most likely crashing the app and if you’re really lucky it will take down your IDE with it.
onPressed: onPressed // OK
onPressed: () => onPressed() // OK
onPressed: onPressed() // VERY BAD!!!
Another common error is dealing with the ‘need layout/need paint’ error in rows and columns. The short answer is try adding an Expanded or Flexible widget, for a more detailed explanation checkout this great series (@scottstoll2017).
Lastly in the ‘mistakes I continue to make’ category is remembering to add .toList() when using a map to general a list of widgets.
I still rely on print statements for debugging more than I’d like to admit but by default the output can be cut off. You can use debugPrint and set a value for wrapWidth to workaround this.
debugPrint(string, wrapWidth: 1000);
Finally, here are few key Flutter links to be aware of. The projects page in the Flutter repo on GitHub provides a great high level view on what the Flutter team are actively working on. This list of links from GitHub is an excellent collection of docs detailing where the project is going in the future and the wiki has a ton of great info.
Let me know if you think I missed anything in the comments and I’ll update the post.
Hope you found this useful! You can follow me on Twitter @hillelcoren or checkout some of the projects I’m working on:
When we decided to start from scratch and build a v2 of Invoice Ninja one of our first actions was drafting a blog post to share with our community.
Before sharing it with everyone we initially posted it in our Slack group. I can’t overstate how valuable the feedback was. I thought it may be worthwhile to share the before/after versions of the post.
Here’s the initial draft.
Fork In The Road
We’re coming up on five years since we first started working on Invoice Ninja and are at a critical point in our company’s story.
When we first started working on the app we were experienced developers & marketers with basic understanding of invoicing. Over this time we’ve had the opportunity to learn a tremendous amount about invoicing practices around the world.
Although we’ve taken great care to keep our code to a high quality, a combination of domain considerations and changes to our underlying frameworks have made our code less than the perfect ideal we’re striving for.
We now have a choice to make. We can either maximize immediate profits and short terms gains, or work to reduce our technical debt creating a stable platform for the future. We choose the latter.
Our plan is simple… while building the new version, hosted platform users will continue to receive security and bug fixes. Once we’ve completed the core features existing users will be able to easily migrate over.
For self-host users we’ll create a branch in our GitHub repository which will include new features added by the community. We’ll also continue to improve our new mobile app making sure it’s entirely feature complete.
We’re at the beginning of something amazing. As always, we will be completely transparent with our work. You’ll be able to follow the development process in our GitHub repository, the new version will of course be entirely open source.
If you have any concerns please don’t hesitate to contact us. We see this as a great opportunity and hope with your input we’ll be able to create an even more outstanding invoicing platform.
Here is some of the (extremely helpful) feedback we received:
Rob: Is this a v2 or something else?
Gijs Rutten: Is there a migration process?
Billyggla: Those who have used Invoice Ninja will understand the post and the reasons behind it. However someone new to Invoice Ninja reading the post may come away with “Although we’ve taken great care” “less than the perfect ideal” “maximize immediate profits”. It may be simpler to put across the point that Invoice Ninja is at the forefront of invoicing software and you can continue to use it while we focus on…
Nateamus: Transparency is the key to any successful open source project but I think you can be a little to militant about it to the point of creating fear. Really, the net effect of this will be a vastly improved experience once everything has been refactored. Instead of posting about how you’ve “…taken great care” etc etc, I would simply inform the user base that you have bandwidth constraints and perhaps won’t be as responsive to requests because you are focusing on improving the core product. I agree with Billy that it may be a tad alarming. The net effect is going to be amazing with no change in vision, mission or direction, just perhaps less bandwidth. Perhaps that could be the focus.
Olivier B. Deland: I think your post is maybe too “developer-friendly”. I would start with something more client-friendly, saying that you are starting a 2.0 version which will allow you to pump more great features faster in the future, cleaner UI, or whatever, etc. Then, start a new sub section with the transparency details for people who are more interested in those things. Non-technical people, who will just stop reading at this point, need to be reassured already that everything is fine and for the better.
Finally, here’s the revised version incorporating the feedback.
Invoice Ninja v2.0
We’re excited to announce that we’re starting work on a major redesign of Invoice Ninja! By upgrading to the latest and greatest web technologies we’ll be able to provide more features at a faster rate.
We’re a small team, accomplishing this task will requires us to slow down feature development of the current version while we focus on v2.0. Once the new version is ready you’ll be able to click a button to migrate all of your data and settings.
For self-host users we’ll create a branch in our GitHub repository which will include new features added by the community. We’ll also continue to improve our new mobile app making sure it’s entirely feature complete.
As always, we will be completely transparent with our work. You’ll be able to follow the development process in our GitHub repository, the new version will of course be entirely open source.
If you have any concerns please don’t hesitate to contact us. We see this as a great opportunity and hope with your input we’ll be able to create an even more outstanding invoicing platform.
Thankfully our announcement went extremely well. I believe the revised post does a much better job of explaining our intentions without causing unnecessary fear. I’m extremely grateful to our community for their help here and of course their ongoing support of our project. We’re a few months in now… v2 is coming along great.
We’re now about 3 months into the project (with a short detour to work on itsallwidgets.com), I thought it may be helpful to share some more thoughts on using Redux to manage state in Flutter.
What about BLoC?
I don’t believe there are ‘better’ architectures, selecting the right one for your app comes down to your specific needs and background. Redux has been around long enough that it’s become a well understood architecture, most topics are covered by detailed tutorials. They’re typically for React/JavaScript but it’s straightforward to port the ideas to Flutter/Dart.
While I haven’t used it myself developers are clearly very happy with the BLoC pattern. My sense is the differences between Redux and BLoC are similar to Redux and MobX. I think Dart’s first class support for streams combined with the reactive nature of Flutter make the BLoC pattern a great fit. It’s worth noting that under the hood the flutter_redux library is just providing a wrapper for StreamBuilder, you don’t have to feel like you’re missing out using streams with Redux.
I find it interesting that in the JavaScript/React world you have to convince developers not to use Redux whereas with Flutter it seems to be the opposite, that said I really like this tweet from Dan Abramov the co-creator of Redux.
I’m endorsing MobX because I hear its happy users and I hate to see FUD against new approaches. But I still prefer immutability 😉
Another valid criticism of Redux is that debugging the code can require a lot of searching for matching actions. I don’t have any experience developing plugins for an IDE but I’m curious if it’s possible to build a plugin which understands the app state and reducers, enabling you to trace the Redux flow the same way you can drop down into the source code. UPDATE: turns out it’s possible… here’s the plugin.
Don’t rebuild too much
The main challenge we faced initially was preventing too much of the app from getting rebuilt when the state changed. For example, we weren’t able to keep a bottom sheet open if a setting was selected. The problem was that we were using a StoreBuilder in main.dart, this meant any change rebuilt most of the app. The solution was to move the rebuilding further down the widget tree limiting it to just the parts of the app which needed to be updated.
If you’re basing your app of off Brian Egan’s excellent Redux architecture sample take note that this approach is currently used. It can work for some apps but it’s definitely something to be aware of.
Related to this it’s important to note that all widgets, including non-visible widgets further down the navigation stack, are rebuilt when the state changes. In our app we simply keep the navigation stack short. but you can set distinct to true to only update the view when the state is updated. Note: this also requires overriding == and hashCode on the view model.
Boilerplate Code
I think the main criticism of Redux is that small changes to the functionality can require large changes to the code. In my experience this is accurate. These metrics are from Brian’s comment on the Reddit post linked above.
At this point, scoped_model requires the least amount of code at ~800 LOC. Next best is simple_bloc at around ~900. Finally Redux was ~1200.
It was clear from the outset that app would require a lot of boilerplate code, rather than write it by hand we created a library to help generate it for us.
While I agree less code is generally better than more code (every one less line of code we write is one less line for a bug to hide in), our main objective is to build the best app with the fewest bugs possible. Redux provides a form of state machine for your UI/UX making it far more predictable, that benefit though does require paying a Redux tax in the form of additional lines of code.
Built Value
I mentioned this in the last post but it’s too important not to mention again. If you’re building a Redux app strongly consider using built_value to handle immutability. It’s possible to build a Redux app without it however it would require writing a ton of extra code by hand.
A great feature is that it automatically adds support for object equality, this is extremely useful when managing forms. One challenge however is if the app supports creating multiple blank records they’ll end being equivalent. Our solution is to use a static counter to set a negative id for new records, once they’re saved to the server the ids are replaced.
Although built value supports the @nullable annotation I’d advise avoiding it if possible. To support creating new records in the app we use a factory constructor which sets default blank values. One of the many problems with using the @nullable annotation is a new record will appear changed by the form because the field will be set to an empty string rather than null.
It’s worth noting if you’re making a lot of changes consider using the watch command rather than the build command, it’s much quicker to update the files.
Forms
We created this sample app which demonstrates our approach to forms. To persist state while typing we listen for changes to the TextEditingController, when they’re detected we use the view model to update the store. When the user clicks ‘Save’ we run the form validation, if it passes we persist to the server.
To support localization (ie, number or date formatting) we initially passed all of the supporting data to the forms in the view model however found it required a fair amount of extra code mapping each of the fields and then passing it down. Instead we now just pass the context to a formatting utils class and use StoreProvider.of<AppState>(context).state; to access the state.
If you use this approach it’s important to move any initialization code from initState to didChangeDependencies. This is spelled out clearly in the docs for the State class.
Subclasses of State should override didChangeDependencies to perform initialization involving InheritedWidgets.
Gotchas
Like most design patterns done right Redux can be amazing, however if done wrong it can become painful to say the least. One critical aspect is separating application state from transient UI state. We’ve found we use a combination of dispatching actions alongside some calls to setState() for cases where we’re managing transient state.
To support changing top level settings such as the application theme or locale we use a custom AppBuilder widget, this enables to on-demand rebuild the entire app. You can read more about it here. Our top level widgets are ReduxStore > AppBuilder > MaterialApp, this enables us to rebuild the MaterialApp without affecting the store.
If you’re using a form in a dialog and the state changes the form will rebuild with the latest values from the state, this may or may not be the desired behavior. We prevent it by checking if the form has already been initialized.
In middleware functions take note of whether next(action); is at the beginning or end of the function, it will determine whether or not the state is updated before/after the code is executed.
Debugging
If you’re using the flutter_redux package I’d highly recommend installing redux_logging, it automatically prints the Redux actions to the console. This is really helpful when trying to debug the app.
By default the output will include the entire state (which can get pretty big), you can override the toString method on the state class to just print the relevant info.
Wrap Up
Flutter is amazing… whether you use Redux, BLoC, ScopedModel or something else you’ll be able to quickly build a great app. In my time with Redux I’ve found it works incredibly well for our use case (a CRUD style app). I think a key metric for these choices is whether development speeds up or slows down over time, we’ve found we’re constantly accelerating.
Update: although this widget does work as described it’s an anti-pattern. The better approach would be to define the state and let Flutter handle it. Thanks to Pascal Welsch for pointing this out and Iiro Krankka for providing a working example.
Settings which are defined in the MaterialApp widget, such as the theme or locale, require the entire widget tree to be rebuilt when changed.
This article (and package) by Norbert Kozsir make it easy to set the app’s theme however in our case we need to manage additional top level properties including the locale. All of the settings are stored in our central data store, we just need to tell the app to rebuild after the settings are changed.
This AppBuilder widget (which is a stripped down version of Norbert’s solution) makes it possible for any part of the widget tree to request the app to be rebuilt. I believe the key aspect which makes it work is that the build method calls a builder function rather than directly returning a child widget.
We’ve been working on our Flutter mobile app for a few months now, I thought it may helpful to share some of the techniques we’re using to help keep our code maintainable.
Create widgets!
Keep your code DRY (don’t repeat yourself). Refactoring widgets is just like refactoring standard code, look for patterns of duplicate code and refactor it out to a widget. Widgets can be incredibly small but if used throughout the app they both reduce code and make it easier to apply changes later on.
For example we created an ElevatedButton widget which wraps a standard RaisedButton class so it always has a consistent elevation and enables setting the color or applying an icon. Another example is this IconText widget which just makes it easier to show an icon and text together.
Wrapping/extending widgets is a great way to customize the framework to suit your needs. We try to follow the convention where the name of the widget is the concatenation of the child widgets it combines.
View models
One of the core principles of software architecture is SRP (Single Responsibility Principle). As the views get more complicated a great way to implement separation of concerns is to create a view model which backs the view.
This enables the view to focus on the layout of the UI while the view models manage the view logic. For example, the view model would handle preparing data (ie, caching using memoize) from the central store to the format needed by the view and provide methods to dispatch actions to update the store.
Completers
In the app it’s common for the user to trigger an action in the UI which depends on completing a successful request on the server. For example, saving a new record.
Initially we passed the context in the action and had the middleware use the context, however we’ve found using completers provides much cleaner code in the UI layer.
We use a utility class to create common completer types. For example. a snackBarCompleter will show a SnackBar message if the request completes successfully or a modal ErrorDialog if the request fails.
final completer = snackBarCompleter(context, localization.archivedProduct)
store.dispatch(ArchiveProductRequest(product.id, completer));
There’s also a popCompleter which is used by actions dispatched from dialogs which will automatically close the dialog and return the response message in the call to pop().
Enums
Our app has many modules, for example: clients, products, invoices, tasks, expenses, … They all provide similar functionality (list, view, edit, archive, delete, restore) and then some provide other actions such as invoice or email.
To support this we use built_value enums. In this case we have an EntityType enum and an EntityAction enum. A nice aspect of this solution is it’s automatically serialized/deserialized when the state is persisted.
Our custom widgets then can accept an EntityType parameter which can be used to configure itself from the store. We’ve also added a lookup function in the AppLocalization class to help with translations.
Persistence
Our solution to persistence is to split up the core parts of the store (data, UI and auth) to persist each part separately. As a user makes changes to a new record we can constantly persist the UI store without needing to persist the data store which could potentially have tens of thousands or records.
If a user starts to create a new record and then quits the app we’re able to present the partially completed record when the app is relaunched. This is handled in the code by having any action which requires persistence (such as when data is loaded or modified) implement the PersistData or PersistUI abstract classes.
class SortProducts implements PersistUI {
  final String field;
  SortProducts(this.field);
}
Abstract classes
We have two types of data in the app: editable entities which the user can create and edit (such as clients and invoices) and static data which can be referenced but not changed (such as the list of languages or currencies).
To support typical interactions in the app (ie, selecting a choice from a list) we’ve created a SelectableEntity abstract class. The built_value classes then implement the class. This provide a way for each entity type to define how it should be presented and searched in a list, we use the subtitle of the ListTile to show the matching field. This class is implemented by both types of data.
The editable entities implement the BaseEntity class which provides shared functionality such as archiving and deleting and handles filtering the list by their state (active, archived or deleted) and status (ie, draft, sent, paid, …).
Clean code
If you’re just getting started I’d highly recommend using a more comprehensive analysis_options.yaml file. Our approach was to start with the Flutter project’s file and comment out if needed. This can be harder to change in an existing app as it can generate thousands of new warnings.
Hope you found this useful, if anything’s unclear or can be improved please let me know. You can follow my thoughts on Flutter on my Twitter feed or subscribe to the blog for more posts. Thanks for reading!
It goes without saying that one of the best sources for information about Flutter are the API docs. Many of the widgets provide detailed explanations with useful samples.
If you have a specific widget you’re trying to use the docs are extremely helpful but if you’re new to Flutter and just want to do a bit of reading up it can be hard to find some of this great content. So of course as a developer I wrote a script…
The following list shows the widgets included in the material library sorted in reverse order by length of the explanation text.
My perspective on Dart has quickly changed from being a language I needed to learn to build something with Flutter to a language I enjoy using on a daily basis.
When starting with Flutter you often hear that Dart is just like JavaScript. Well, it is… except for when it isn’t. I thought it may be helpful to highlight some of the subtle ways in which Dart differs from JavaScript to make it easier to get up to speed when switching languages.
Conditions must have a static type of ‘bool’
In addition to types, Dart is in general a stricter language. In JavaScript you can use any ‘truthy’ value in a conditional. For example:
var name = 'Joe';
if (name) {
  // do something...
If you try the equivalent code in Dart you’d see “Conditions must have a static type of ‘bool'”. The reason is that Dart requires that a condition is a bool true not just a ‘truthy’ value. You could correct the code by changing it to:
As a side note I saw this great tip on Twitter to use the same analysis_options.yaml as the Flutter team. It’s been a big help getting up to speed with Dart best practices in general.
Where is console.log
Although I’m constantly trying to train myself to rely on the debugger old habits die hard. In place of console.log you can use print. Dart supports string interpolation so whereas with JavaScript you may write:
console.log('Name is %s', name);
With Dart you’d use:
print('Name is $name');
If you need to access properties on the variable or call functions you can wrap it in curly braces.
print('Length is ${name.length}');
Function Parameters
This is one area where I think JavaScript and Dart are the most different. Dart provides a far more powerful implementation but it can take a bit of time to adjust to.
This answer on StackOverflow by Seth Ladd does a great job of explaining the differences in detail. At a high level with Dart you can either pass parameters in set positions:
getFullName('John', 'Doe');
Or you can pass them by name:
getFullName(firstName: 'John', lastName: 'Doe');
For constructors you can use this.fieldName to tell Dart that the value passed should be assigned to the property.
Contact(this.firstName);
Handling Arrays
Arrays are mainly the same but there are a few differences worth pointing out. A key difference is that you add an item to array by calling add rather than push.
Dart provides helper methods first and firstWhere which you may not be surprised to learn returns the first item in the array. What’s less obvious is that by default if a match isn’t found the methods will throw an error. You can handle this case by specifying a value for orElse which will be returned if no item is found.
Final and Const
This one took a while for it to sink in. I think this post does the best job explaining the differences that I’ve found. The key difference between final and const is that ‘final’ describes the variable whereas ‘const’ describe the value itself. A final variable can only be set once but the value it points to can be changed, a const’s value is frozen and can not be changed.
Another good tip you’ll get from using the Flutter analysis_options file is to use const constructors where possible when creating your widgets. This can have a great impact on your app’s performance by enabling the framework to cache the widgets.
Fat Arrow
The ‘Fat Arrow’ or => can be used for single line functions. For example, instead of:
someField: () {
  return true;
},
You could write:
someField: () => true,
It seems like a small difference but it can definitely have a positive impact on the readability of the code.
Odds & Ends
To wrap up here are a few other points worth keeping in mind.
To convert a value (for example) to a double you can either use double.parse or double.tryParse. The former will throw an error if it fails whereas the latter will not.
You can use null-aware operators (ie contact?.firstName) to make it easier to handle null values. This post (also by Seth) does a great job explaining it in detail.
Hope this helps, if anything’s unclear please let me know and I’ll update it.